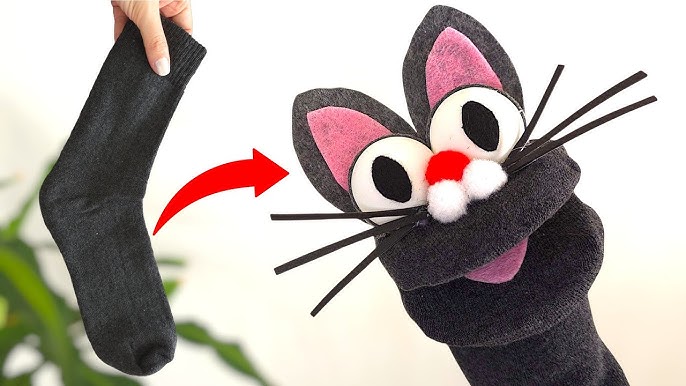
Have you ever looked at an old sock and wondered if it could become something fun and cute? What if you could turn that simple sock into an adorable cat in just a few easy steps?
Making a sock cat is not only a creative way to reuse something you already have, but it also gives you a chance to craft a charming little friend. Whether you’re looking for a quick craft to brighten your day or a unique gift idea, this guide will show you exactly how to make your own sock cat.
Ready to bring your sock to life? Let’s get started!
Materials Needed
Making a sock cat is a fun and simple craft project. Gathering the right materials helps you create a cute and sturdy toy. This guide explains what you need before you start.
Prepare all items on a clean workspace. Having everything ready makes the process easy and enjoyable.
Choosing The Right Sock
Pick socks that are soft and clean. Cotton socks work best because they are easy to sew and shape. Avoid socks with holes or stains.
- Use a single sock, preferably ankle or crew length
- Choose bright or pastel colors for a cute look
- Avoid thick wool socks; they are hard to shape
- Check that the sock is stretchy but not too thin
Additional Supplies
You will need some extra items to complete your sock cat. These supplies help with filling, sewing, and decorating your toy.
| Supply | Purpose |
| Polyester stuffing | Fill the sock cat to make it soft |
| Needle and thread | Sew the sock parts together |
| Scissors | Cut the sock and thread |
| Buttons or beads | Make eyes or nose |
| Fabric glue (optional) | Attach small decorations safely |
| Marker or fabric pen | Draw facial features |

Credit: www.youtube.com
Preparing The Sock
Making a sock cat starts with preparing the sock carefully. Clean and cut the sock to get the right shape and size for your project. Marking the key areas will help you sew and assemble the parts correctly.
Cleaning And Cutting
First, choose a clean sock without holes. Wash it if needed to remove dirt or dust. Dry the sock completely before cutting to keep the fabric firm.
- Pick a sock made of soft fabric like cotton or wool
- Wash the sock with mild detergent
- Dry the sock fully, preferably air-dry
- Use sharp scissors to cut the sock
- Cut the sock to separate the leg and foot parts
Marking Key Areas
Mark the sock parts where you will sew or add details. Use a fabric marker or chalk to draw the lines. Mark the head, ears, tail, and body sections clearly before starting.
| Part | Location on Sock | Purpose |
| Head | Toe end of the sock | Shape the cat’s face |
| Ears | Upper sides of the sock leg | Create pointy ears |
| Body | Main part of the sock leg | Stuff and form the body |
| Tail | Extra fabric strip or sock end | Attach as tail |
Crafting The Cat Body
Creating the body of your sock cat is fun and simple. This part gives your cat its shape and charm.
Follow the steps carefully to make a soft and cuddly cat body from a sock.
Stuffing The Sock
Stuff the sock with soft filling to make the cat plump and huggable. Use small amounts at a time to avoid lumps.
- Start filling from the toe end of the sock.
- Push the stuffing evenly inside using your fingers or a pencil.
- Fill until the sock is firm but still soft to touch.
- Leave some space near the open end to shape the head later.
Shaping The Head And Body
After stuffing, shape the head and body by tying and pinching the sock. This helps give your cat a clear form.
| Part | How to Shape |
| Head | Pinch the sock near the open end and tie tightly with thread. |
| Body | Adjust the stuffing to form a round body below the tied head. |
| Neck | Leave a small space between head and body to define the neck. |
Adding Facial Features
Adding facial features brings your sock cat to life. It makes your craft look cute and fun.
You can add eyes, a nose, and other details to give your sock cat character. Use simple materials and tools.
Creating Eyes And Nose
Choose small buttons, beads, or felt pieces for the eyes and nose. These items work well for sock cats.
Place the eyes near the top of the sock head. Put the nose just below the eyes in the center.
- Use black buttons or beads for eyes
- Cut a small triangle from pink felt for the nose
- Glue or sew these pieces carefully
- Keep the features close but not touching
Sewing Or Gluing Details
Sewing gives a stronger hold but takes more time. Use a needle and thread that matches the material.
Gluing is faster and easier. Use fabric glue for a clean look. Let glue dry fully before handling.
- Sew buttons or beads with small stitches
- Apply fabric glue thinly to felt pieces
- Allow glue to dry at least an hour
- Check that all parts are secure before finishing
Making The Ears And Tail
Creating the ears and tail gives your sock cat its character. Use simple steps to shape and attach these parts.
Focus on cutting the right shapes and securely attaching them to your sock cat. This makes your craft look neat and fun.
Cutting And Attaching Ears
Cut two small triangles from the sock or fabric for the ears. Make sure they are the same size for balance.
Fold the base of each triangle slightly to give the ears a 3D look. Sew or glue the ears on top of the sock cat’s head.
- Cut two equal triangles about 2 inches wide
- Fold the base to form a small edge
- Attach ears by sewing or using fabric glue
- Place ears evenly on the head’s top
Forming The Tail
To make the tail, cut a long strip from the sock or fabric. The length depends on how long you want the tail.
Roll or fold the strip tightly to give the tail shape and firmness. Attach it to the back bottom part of your sock cat securely.
- Cut a strip about 6 to 8 inches long
- Roll or fold the strip to make it firm
- Sew or glue the tail to the back bottom
- Check if the tail is secure and stable

Credit: www.reddit.com
Final Touches
After making your sock cat, the last steps make it special and safe. These final touches help your sock cat look great and be pet-friendly.
Focus on decorating and personalizing your sock cat. Also, check that it is safe for your pet to play with or cuddle.
Decorating And Personalizing
Use simple decorations to give your sock cat a unique look. Add eyes, nose, and whiskers with fabric paint or felt pieces.
Sew on small buttons or use embroidery thread for details. Avoid anything that can easily fall off.
- Glue or sew on felt ears and tail
- Use fabric markers for facial features
- Add a small ribbon or bow for charm
- Keep decorations secure to last longer
Ensuring Safety For Pets
Make sure all parts are tightly attached. Loose pieces can be dangerous if your pet swallows them.
Use non-toxic materials and avoid sharp objects. Check your sock cat regularly for wear and tear.
- Sew decorations firmly instead of gluing
- Use pet-safe stuffing like cotton or polyester
- Avoid small parts that pets can chew off
- Inspect the toy before giving it to your pet
Tips For Customization
Making a sock cat lets you add your own style and creativity. Small changes can make each cat unique and special.
This guide shows easy ways to customize your sock cat with different patterns and fun accessories.
Using Different Sock Patterns
Choose socks with patterns that match your idea for the cat. Patterns can change the look a lot.
- Striped socks give a playful and bright look.
- Polka dot socks add a cute and fun style.
- Plain socks let you add your own decorations easily.
- Animal print socks make the cat look wild or exotic.
- Seasonal or holiday patterns make great gifts.
Adding Accessories
Accessories bring your sock cat to life. Add small touches to give it character and charm.
| Accessory | Purpose | Ideas |
| Buttons | Eyes or nose | Use black or colorful buttons for eyes |
| Yarn | Whiskers or tail | Attach yarn pieces for whiskers or a fluffy tail |
| Fabric scraps | Clothes or patches | Make little scarves or patches to add color |
| Ribbons | Collars or bows | Tie a ribbon around the neck for a cute collar |
| Beads | Decoration | Sew beads on the body for sparkle |

Credit: www.mysocalledcraftylife.com
Frequently Asked Questions
What Materials Do I Need To Make A Sock Cat?
You need one clean sock, cotton or polyester stuffing, scissors, needle, thread, and decorative items like buttons or fabric markers.
How Long Does It Take To Make A Sock Cat?
Making a sock cat typically takes 30 to 45 minutes, depending on your crafting skills and design complexity.
Can Kids Safely Make A Sock Cat?
Yes, kids can make sock cats with adult supervision, especially when using needles or scissors to ensure safety.
How Do I Stuff The Sock Cat Evenly?
Stuff the sock slowly, adding small amounts of stuffing to avoid lumps and create a smooth shape.
Conclusion
Creating a sock cat is fun and simple. Perfect for beginners. Gather your materials and follow the steps carefully. Each step brings your sock cat to life. You’ll enjoy the creative process. Plus, it’s a great way to recycle old socks.
A fun activity for kids and adults alike. Share your sock cat with friends or family. They’ll love the creativity. Keep practicing to make even better sock cats. Enjoy your new handmade friend. It’s rewarding and relaxing. Ready to try another craft project?
Dive in and explore more creative ideas.